In part 2 of this series of guides, we will create a ZFS pool on our storage media, and then create our first LXC container to provide access to them over the network.
What is ZFS?
ZFS, short for Zettabyte File System, was first released 20 years ago next month (November 2025). It provides not just the functions expected of a filesystem, which manages the data thats stored on a volume, but also functions as the physical volume manager, allowing us to take multiple physical disks, and present them to the OS as a single, formatted, device.
There are many articles out there discussing the pros and cons of ZFS, but for out purposes here, the benefits are the ease of configuring, expanding, and encrypting our storage, whilst also providing excellent data integrity.
Working with ZFS
In the previous part of this series, we described the hardware I use in my own system. For the purposes of this article I will refer to the 3 16TB drives as the “storage drives”. While my system employs 3 drives, in a RaidZ1 configuration, there are a number of other configurations that may suit your needs better. In short, the configuration you choose will be decided by your number of drives, your desired failure tolerance, and your budget.
Disk Counts and Redundancy
Starting with the most basic setup, a single drive, you will lack the resiliency of redundant multi-disc arrays, but it wil be the most cost effective solution. If your data doesn’t matter, and the loss of this copy will be a non-issue, this is probably the choice for you. You will be able to use all the storage you pay for.
Adding a second drive will allow you to create a 2 drive array. Here you have a choice. You can have more capacity and faster transfer speeds, or data redundancy. By opting for a striped array, you are choosing to split each file into two, and storing half on each drive. A single drive failur will cost you all your data. Alteratively, selecting a mirrored array creates a complete copy of the data on both drives. As a result, your storage capacity will be limited to the capacity of the smallest disk in the array. The upside is one drive can fail without any risk of data loss. The downside is its double the cost for the same capacity as a single drive.
When we switch to 3 or more disks, we have even more choices. Here, we can have redundancy without sacrificing half our available drive space by using RAIDZ. This is the ZFS implementation of RAID. It is one of the best reasons to use ZFS. While the previously discussed striped and mirrored arrays are equivalent to RAID0 and RAID1, when adding a third disk we can use RAIDZ1, the ZFS equivalent of RAID5. This adds a parity block, providng a single drives worth of redundancy. The benefit if this is that, like the mirrored array, we can loose a single drive with no data loss, but we sacrifice a single drives worth of storage. This is what I use in my system, which means that the 3 16TB drives I use give me 32TB of redundant storage. Adding a fourth disk would give me 48TB of space and so on and so forth.
We can go further still, and use RAIDZ2. This is suitable for arrays of 4 or more drives, and protects from the loss of up to 2 drives, at the cost of 2 drives worth of storage space. It requires 4 or more drives, as with 3 drives you would use a mirrored array to provide the same level of redundancy. Similarly, RAIDZ3 offers 3 drives of redundancy for arrays of 5 or more drives.
As you can see, there is a careful balancing act between redundancy, performance, and price. What is right for me may not be right for you, so as long as you consider what you need, you wont go far wrong.
Creating the ZFS Pool.
Before we can use the disks, we need to add them to a ZFS pool. To start this process, we can first need to identify our drives. In the terminal on the Proxmox host, we can do this with a single command.
lsblk -o NAME,SIZE,MODEL,FSTYPE,LOG-SEC,PHY-SEC,SERIAL
You’ll get an output similar to this, though it probably wont list any partitions (sda1 for example) if you are using fresh drives:
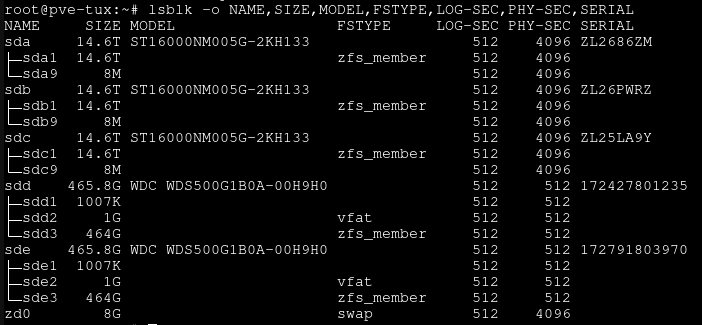
Here, we can use the model numbers and drive sizes to find the desired discs. In this case, we want to use the top 3 16TB drives, as the 2 500GB drives are already in a mirrored pool that acts as our boot disk.
Now that we know the drive names, in this case sda, sdb, and sdc, we could use these to create the pool, however we can make our lives easier later by adding one more step now. Instead of referencing the drives by the names they were assigned by the OS, we can instead reference them using their unique IDs. This means that if down the line we have a drive failure, we can more easily identify exactly which drive has failed by matching the serial number on the drive label with the drive ID (this is not necessarily the case, as the drive ID doesn’t have to contain the serial number, but in practice I’ve never seen it). To find the drive ID, we can use another simple command.
ls -lh /dev/disk/by-id | grep -e <Drive1 NAME> -e <Drive2 NAME> -e <Drive3 NAME>
This will give us the an output similar to that in the image below, though it will likely be a lot shorter as you again should not have any partitions present on the drives.
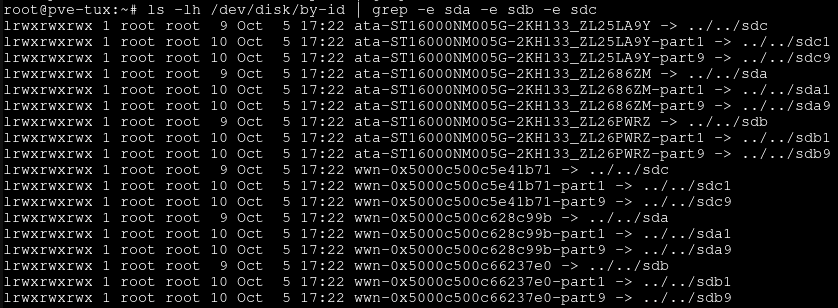
The lines we are interested in are those starting ata-and ending in /sda, /sdb, and /sdc. The part before the arrow is the drive ID, with the part after the final underscore in this case being the drive serial number. We make a note of these IDs for use later, and move onto the next step.
We still have a little work to do before we can create the pool. In order to encrypt the pool, we need a key. Creating one is simple, using:
openssl rand -out /ZFS/Keyfiles/<POOLNAME>.key 32
This will create a 128-bit hex key which we can use to secure our pool. For it to work properly, we need to set the permissions correctly:
chmod 0400 /ZFS/Keyfiles/<POOLNAME>.key
Before continuing, I heavily recommend copying this key somewhere safe, perhaps to a password manager or secure cloud storage, as losing it will result in a loss of all your data.
We’re finally ready to create our pool. The following command contains a lot of options, and we’ll go through them in a second.
zpool create <POOLNAME> raidz -o ashift=12 -O compression=on -O atime=off -O xattr=sa -O recordsize=1M -O encryption=on -O keyformat=raw -O keylocation=file:///ZFS/Keyfiles/<POOLNAME>.key -O canmount=off <DRIVE IDs>
The list of options called, and their effect is given below. You can skip this explanation, but I recommend reading it, since understainding this command, and why each option is set, is important.
raidz - This is equivalent to raidz1, and specifies the array type, as we discussed above. If we don’t specify a type, it will default to a striped array. We can specify mirror, raidz or raidz1 which are equivalent, raidz2, or raidz3.
ashift=12 - This forces the use of 4096-bit sector sizes. Pretty much any modern drive supports this, but many drives default to 512-bit sectors to improve compatibility with older hardware. The larger sector size will typically improve performance.
compression=on - Enables compression of the datasets. on is a good choice as it should remain current and use the default compression method. At the moment this is LZ4, in future it may change. Unless you have a reason to want a different method, on is fine.
atime=off - Disables logging of access time for files. This is good unless we particularly need it, as it means fewer writes and less cpu time. Its particularly helpful when there are lots of small files you’ll be accessing quickly.
xattr=sa - Controls whether extended attributes are enabled, and which type. Options are on for directory-based, off for, well, off, and sa for system attribute based. Storing extended attributes as system attributes tends decreases the amount of I/O time, and therefore increases performance.
recordsize=1M - This is highly use-case dependant. I will mainly be storing large files on this array, but pick a recordsize that suits your use case. It is also possible to set the recordsize for individual datasets later on, so if you have one dataset containinly large files, and another containing small documents, you can set it lower for that dataset.
encryption=on- Enables encryption of the dataset. This can be used on root datasets, but only if enabled when the dataset is created. Similar to compression=on this is set to on to use the current default choice. Unless you have need of a particular encryption type, this is a good way to go. It is important to note here that we are encrypting the root dataset. This is only possible if you do it at the time you create the pool, and it will automatically encrypt every dataset below it. If you loose the key, you will loose all access. Make sure you back it up somewhere as mentioned above.
keyformat=raw - Defines the keyformat. raw to match the keyfile we produced earlier.
keylocation=file:<Key Path> - Specifies the location of the keyfile we made earlier.
canmount=off - prevents the root dataset (and its children) being mountable. Useful since I dont ever want to store data here, instead I want to add secondary datasets for all my files. I will have to manually permit mounting of datasets later.
You might have noticed that, with the exception of the raidz flag that each option is preceded by wither -o or -O. There is an important difference between these two. -o sets pool properties, specific to the zpool command, while -O sets filesystem properties. These can be applied to any dataset, and unless re-specified in later zfs create commands, child datasets will inherit the values set by their parents. A full list of pool properties is available on the zpool man-page, while a list of filesystem properties can be found on the ZFS manpage.
We want Proxmox to have access to the pool at boot, so we need to tell it to load the keys. This is done by creating a file at /etc/systemd/system/zfs-load-keys.service with the following contents:
[Unit]
Description=Load ZFS encryption keys
DefaultDependencies=no
After=zfs-import.target
Before=zfs-mount.service

[Service]
Type=oneshot
RemainAfterExit=yes
ExecStart=/usr/sbin/zfs load-key -a
StandardInput=tty-force

[Install]
WantedBy=zfs-mount.service
Then reloading the daemon and enabling the new service:
systemctl daemon-reload
systemctl enable zfs-load-keys.service
We can verify the pool is created, and its attributes, using:
zfs list -o name,compression,atime,xattr,recordsize,encryption,canmount

Creating ZFS Datasets
Now that we have a ZFS pool, we need to add datasets below so we can store files on it. I while you can set the root dataset of the pool to canmount=on in the previous step, I recommend leaving it unmountable, and creating child pools. Creating a child dataset is as simple as running a single command, specifying any options you want to change compared to the parent dataset.
zfs create <PoolName>/<DatasetName>
In the above screenshot, you can see I named my Pool Space Below this, I can create a dataset named Sol, and set it to be mountable:
zfs create Space/Sol -o canmount=on`
This will allow me to mount the dataset to add files and folders. Any other filesystem options can be changed here, and will be adopted by any child datasets that are created below this one. There is no practical limit to the number of child datasets. For example, I might choose to create child datasets with the Sol dataset as their parent. Doing so is as running the zfs create command again, specifying any changes you want to make to the options.
zfs create Space/Sol/Earth
As you can see from the screenshot below, the child datasets of Sol have inherited its properties and can be mounted.

SSHFS
There are multiple possible protocols that can be used to access data remotely. NFS is excellent for plaintext network file access, however encryption can be a pain to work with. SMB is a lot more resource intensive, and can be time consuming to configure. SSHFS, also often called SFTP, on the other hand, is encrypted by default, requires no extra software on the sever (other than an SSH server, which is almost mandatory for any remote or headless system anyway), and can be used almost anywhere. It might not be the most performant, especially for multi-tasking, but it is simple and more than good enough for my purposes.
Creating the LXC Container
LXC containers are an excellent way of running virtual systems with less overhead than traditional virtual machines. It shares the host kernel, but provides isolation using namespaces and cgroups. The lightweight nature of LXC containers makes them perfect for our use case. I like to pair this with a light-weight distro to run in the container. Alpine is perfect. It contains the bare minimum of packages while maintaining its usability.
PVE comes with a list of container templates from the off, however they need to be downloaded before they can be used. In the WebUI, select the “local” storage volume in the tree to the left, then select “CT Templates”. On a fresh install, you will have no downloaded templates. To download the Alpine template, select the “Templates” button, and search for Alpine. Download the newest template version, alpine-3.22 at the time of writing, and select download at the bottom of the dialogue box.
Now we have the template downloaded, we can create the container. In the top bar, select “Create CT”. In the dialogu box, take note of the CT ID, we’ll need it later, give it a hostname (I like to call mine SSHFS-{Mountpoint}, makes them super easy to identify when you have loads of VMs and containers), set the root password, and (optionally but highly recommended) add an SSH key. In the next page, select the Alpine linux template you downloaded earlier from the list, and leave the Disks, CPU, and Memory tabs as their defaults. On the next page, set a static IP address that’s within the range of you network, (You’ll also want to reserve it in your routers DHCP server. You wont have a MAC address yet, but you can find it after the VM is created), leave the DNS settings default and click finish. Once you get a “Task OK” message, you can close the dialoge box. You’ll see your new container under your node on the left side of the interface. At present its stopped, so select it, (find the MAC address in the network tab if needed) and then then click the start button at the top of the interface. Thats it. Your container is created and we can move to the next step.
Configuring the Container
This section is super short. You wont be able to SSH into the container yet, as the alpine image we used doesn’t have an SSH server installed. We need this for SSHFS to work, so we can either use the container shell, or go back to the host shell (as we did previously) and use the command
pct enter <Container ID>
I prefer to use this method, but both are valid. The container ID is just the numeric ID we noted earlier. If this is your first VM its probably 100.
However we do it, once we have shell access, we need to run 2 commands. It’s that simple. First we update the packages, and install the SSH server and the apk-cron package which will automatically keep them up to dat in future.
apk --no-cache add openssh-server apk-cron
And then enable SSH server:
rc-update add sshd && rc-service sshd start
If you didn’t set an SSH key when you created the container, you’ll need to set the SSH server to allow root login with password. You’ll also need to do this if you want to access the share from a client that doesn’t support SSH key auth (The Infuse app on apple TV for example). This can be done easily in a single command.
echo "PermitRootLogin yes" > /etc/ssh/sshd_config.d/99-permit-root-login.conf && rc-service sshd restart
This command creates a file containing PermitRootLogin yes into a file which will be used by the SSH server, and will override the options set in /etc/ssh/sshd_config. This method can be used to set any number of options without the need to find and edit them in the original config file.
Adding the ZFS Dataset to the container
If we want the container to have access to the ZFS dataset we created earlier, we need to mount it. We do this from the host shell using the command:
pct set <Container ID> -mp0 /<PoolName>/<DatasetName>,mp=/<PoolName>/<DatasetName>
This will create a mount called mp0, and mount the data to it. This will appear inside the container as /<PoolName>/<DatasetName> and can be mounted remotely, as will be described in part 3 of the guide.
Currently, the ZFS datasets are owned by root on the host. In order for remote clients to be able to properly use the directories, we need to make sure that root within the containers has read/write access to them. The easiest way to do this is to change the ownership of the directories. LXC maps UID 0 to UID 100000, meaning that root (uid 0) in the container has a UID of 100000 on the host. By running the following command in the host shell, we make UID 100000 the owner of all datasets under the root dataset.
chown -R 100000:100000 /<PoolName>/
Thats it. You now have a functioning SSHFS based NAS running in an LXC container. THe overheads for the container are super low, I’ve found a maximum RAM usage of under 14 MB, with its storage footprint coming un under 18 MB.
In the next installment in this series, we will discuss how to access this data using a variety of operating systems and devices.